
Hosting your static site with AWS S3, Route 53, and CloudFront
A guide to using Amazon Web Services to serve your site with HTTPS. For (almost) free.
aws websites
Some time ago I decided to stop freeloading on GitHub pages and move one of my sites to Amazon Web Services (AWS). It turns out that I’m still mostly freeloading (yay free tier) so it amounted to a learning experience. Here are the components that let me host and serve the site at my custom domain with HTTPS.
- Static site in Amazon Web Services S3 bucket
- Route 53 handling the DNS
- CloudFront for distribution and a custom SSL certificate
I set all that up most of a year ago. At the time, I found the AWS documentation to be rather fragmented and inconvenient to follow - it was hard to find what you were looking for without knowing what a specific setting might be called, or where it was, or if it existed at all. When I recently set up a new site and stumbled through this process again, I didn’t find it any easier. Hopefully this post can help to collect the relevant information into a more easily followed process and serve as an accompanying guide to save future me (and you) some time.
Rather than replace existing documentation, this post is meant to supplement it. Think of me as your cool tech-savvy friend on the phone with you at 4am, troubleshooting your website. (Please don’t actually call me at 4am.) I’ll walk through the set up while providing links for the documentation that was ultimately helpful (mostly so I can find it again later…).
Hosting a static site with Amazon S3 and a custom domain
If you’re starting from scratch, you’ll need an AWS account. It behooves you to get one, even if you don’t like paying for services - there’s a free tier that will cover most of the experimental stuff you’re going to want to do in the first year, and even the things I do pay for cost me less than a dollar a month. You can sign up at https://aws.amazon.com/free.
Getting your static site hosted and available at your custom domain is your first mission, should you choose to accept it. Your instructions are here.
Creating the buckets for site hosting on S3 is the most straightforward part of this process in my opinion, and the AWS documentation walkthrough covers what you’ll need to do quite well. It gets a little unclear around Step 3: Create and Configure Amazon Route 53 Hosted Zone, so come back and read on once you’ve reached that point. I’ll make some tea in the meantime.
… 🎶 🎵
Ready? Cool. See, I’m here for you.
Set up Route 53
The majority of the work in this section amounts to creating the correct record sets for your custom domain. If you’re already familiar with how record sets work, the documentation is a bit of a slog. Here’s how it should look when you’re finished:
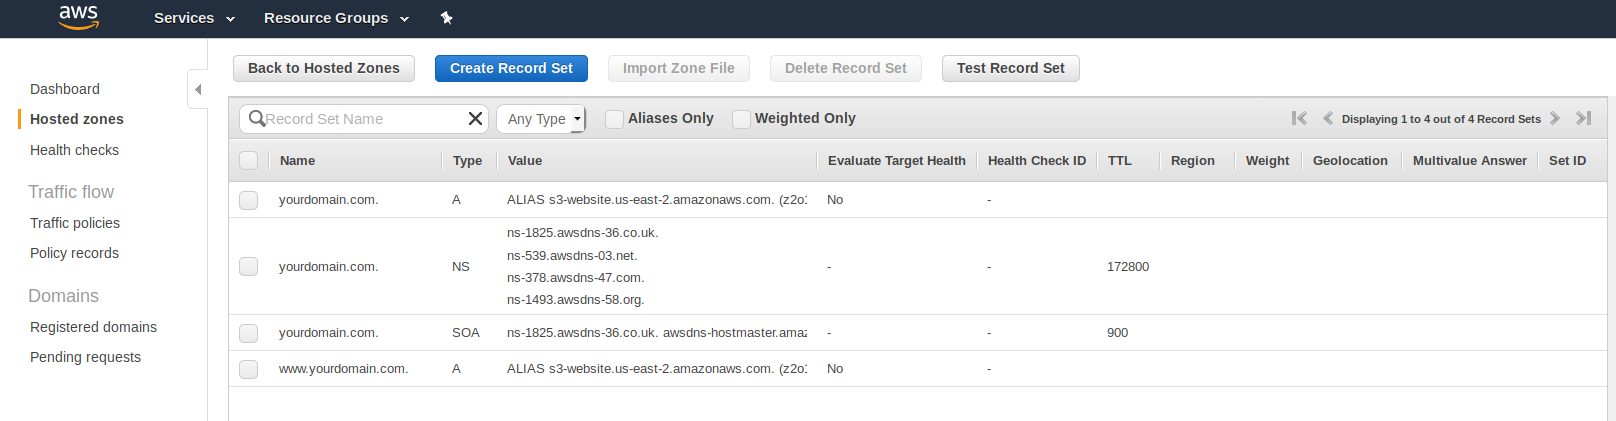
The “NS” and “SOA” records are created automatically for you. The only records you need to create are the “A” records.
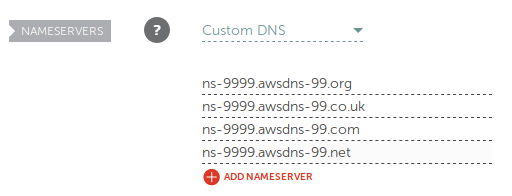
Hop over to Route 53 and follow this walkthrough to create a “hosted zone.” The value of the NS (Name Servers) records are what you’ll have to provide to your domain name registrar. Your registrar is wherever you bought your custom domain, such as this super subtle Namecheap.com affiliate link right here. (Thanks for your support! 😊)
If you created two buckets in the first section (one for yourdomain.com and one for www.yourdomain.com), you’ll need two separate A records in Route 53. Initially, these have the value of the endpoints for your matching S3 buckets (looks like s3-website.us-east-2.amazonaws.com). Later, you’ll change them to your CloudFront domain name.
If you went with Namecheap as your registrar, Step 4 looks like this:
Waiting is the hardest part… I’ve gotten into the habit of working on another project or setting up the DNS change before going to bed so that changes have time to propagate without me feeling like I need to fiddle with it. ^^;
When the transfer’s ready, you’ll see your site at http://yourdomain.com. Next, you’ll want to set up CloudFront so that becomes https://yourdomain.com.
Set up CloudFront and SSL
Here are the instructions for setting up CloudFront. There are a few important points to make sure you don’t miss on the “Create Distribution” page:
- Origin Domain Name: Make sure to use your S3 bucket endpoint, and not select the bucket from the dropdown menu that appears.
- Viewer Protocol Policy: If you want requests for
http://yourdomain.comto always result inhttps://yourdomain.com, choose “Redirect HTTP to HTTPS.” - Alternate Domain Names: Enter
yourdomain.comandwww.yourdomain.comon separate lines. - SSL Certificate: See below.
- Default Root Object: Enter the name of the html file that should be returned when your users go to
https://yourdomain.com. This is usually “index.html”.
SSL Certificate
To show your content with HTTPS at your custom domain, you’ll need to choose “Custom SSL Certificate.” You can easily get an SSL Certificate with AWS Certificate Manager. Click on “Request or Import a Certificate with ACM” to get started in a new window.
Here are instructions for setting up a certificate. I don’t think they’re very good, personally. Don’t worry, I got you.
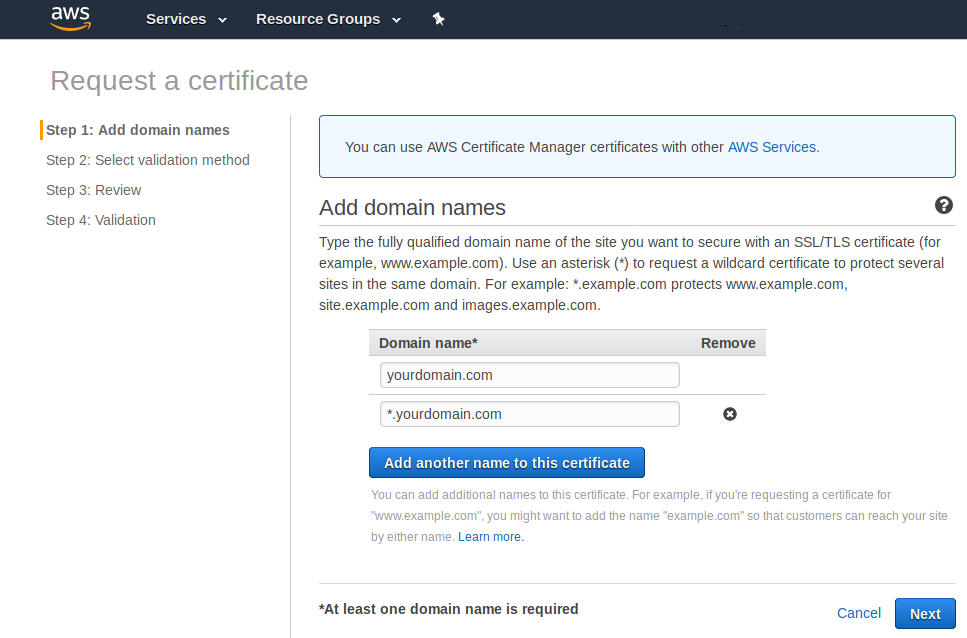
To account for “www.yourdomain.com” as well as any subdomains, you’ll want to add two domain names to the certificate, like so:
Click “Next.” You’ll be asked to choose a validation method. Choose “DNS validation” and click “Review.” If everything is as it should be, click “Confirm and request.”
You’ll see a page, “Validation” that looks like this. You’ll have to click the little arrow next to both domain names to get the important information to show:

Under both domain names, click the button for “Create record in Route 53.” This will automatically create a CNAME record set in Route 53 with the given values, which ACM will then check in order to validate that you own those domains. You could create the records manually, if you wanted to for some reason. I don’t know, maybe you’re killing time. ¯\_(ツ)_/¯
Click “Continue.” You’ll see a console that looks like this:
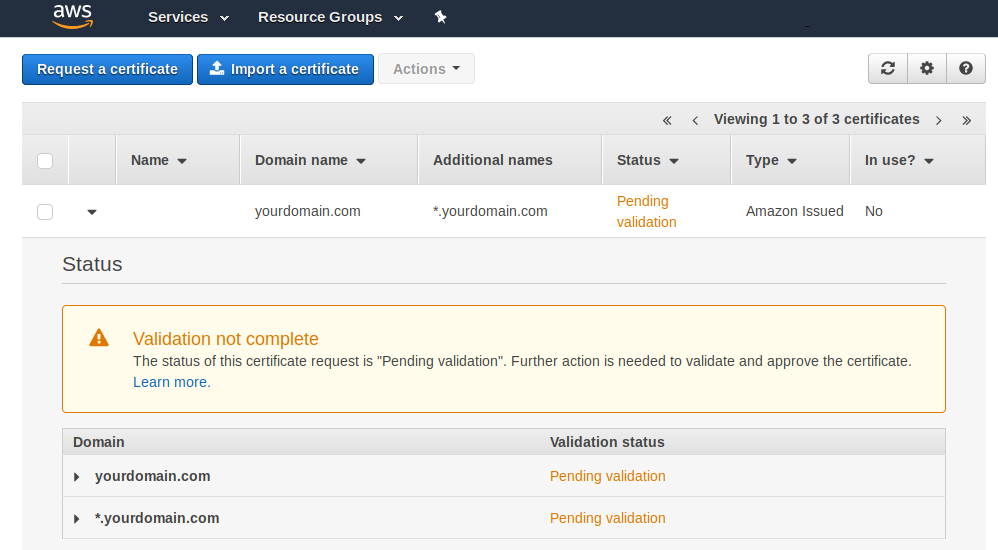
It may take some time for the validation to complete, at which point the “Pending validation” status will change to “Issued.” Again with the waiting. You can close this window to return to the CloudFront set up. Once the certificate is validated, you’ll see it in the dropdown menu under “Custom SSL Certificate.” You can click “Create Distribution” to finish setting up CloudFront.
In your CloudFront Distributions console, you’ll see “In Progress” until AWS has done its thing. Once it’s done, it’ll change to “Deployed.”
One last thing
Return to your Route 53 console and click on “Hosted zones” in the sidebar, then your domain name from the list. For both A records, change the “Alias Target” from the S3 endpoint to your CloudFront distribution domain, which should look something like dj4p1rv6mvubz.cloudfront.net. It appears in the dropdown after you clear the field.
You’re done
Well, usually. If you navigate to your new HTTPS domain and don’t see your beautiful new site where it should be, here are some things you can do:
- Check S3 bucket policy - ensure that the bucket for
yourdomain.comin the S3 console shows “Public” in the “Access” column. - Check S3 bucket index document - In the “metadata” tab for the bucket, then “Static website hosting”. Usually “index.html”.
- Check CloudFront Origin - the “Origin” column in the CloudFront Console should show the S3 bucket’s endpoint (
s3-website.us-east-2.amazonaws.com), not the bucket name (yourdomain.com.s3.amazonaws.com). - Check CloudFront Default Root Object - clicking on the distribution name should take you to a details page that shows “Default Root Object” in the list with the value that you set, usually “index.html”.
- Wait. Sometimes changes take up to 48hrs to propagate. ¯\_(ツ)_/¯
I hope that helps you get set up with your new static site on AWS! If you found this post helpful, there’s a lot more where this came from. You can subscribe to victoria.dev to see new posts first!