

I started blogging about my nomadic travels last year, and so far the habit has stuck. Like all side projects, I won’t typically invest heavily in setting up web properties before I can be reasonably certain that such an investment is worth my time or enjoyment. In other words: don’t buy the domain until you’ve proven to yourself that you’ll stick with it!
After some months of regular posting I felt I was ready to commit (short courtship, I know, but we’re all adults here) and I bought a dedicated domain, herOneBag.com.
Up until recently, my #NomadLyfe blog was just a subdirectory of my main personal site. Now it’s all grown up and ready to strike out into the world alone! Here’s the setup for the site:
- Static site in Amazon Web Services S3 bucket
- Route 53 handling the DNS
- CloudFront for distribution and a custom SSL certificate
- Disqus for comments
If you’d like a walk-through for how to set up a new domain with this structure, it’s over here: Hosting your static site with AWS S3, Route 53, and CloudFront. In this post, I’ll just detail how I managed to move my blog to the new site without breaking the old links or losing any comments.
Preserve old links with redirection rules
I wanted to avoid breaking links that have been posted around the web by forwarding visitors to the new URL. The change looks like this:
Old URL: https://victoria.dev/meta/5-bag-lessons/
New URL: https://heronebag.com/blog/5-bag-lessons/
You can see that the domain name as well as the subdirectory have changed, but the slug for the blog post remains the same. (I love static sites.)
To redirect links from the old site, we’ll need to set redirection rules in the old site’s S3 bucket. AWS provides a way to set up a conditional redirect. This is set in the “Redirection rules” section of your S3 bucket’s properties, under “Static website hosting.” You can find the documentation here.
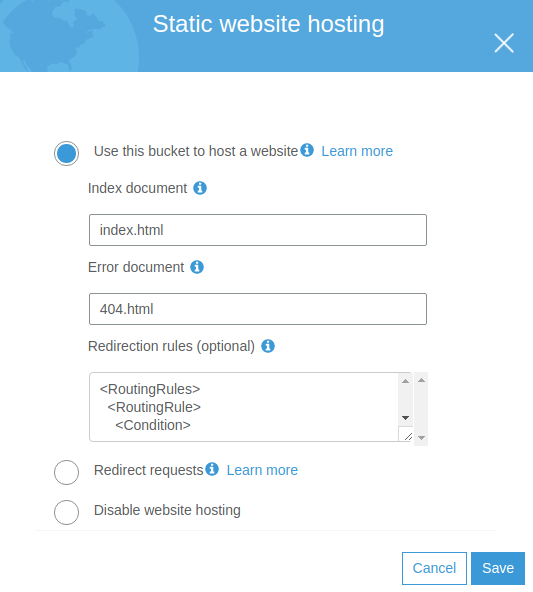
There are a few examples given, but none that represent the redirect I want. In addition to changing the prefix of the object key, we’re also changing the domain. The latter is achieved with the <HostName> tag.
To redirect requests for the old blog URL to the new top level domain, we’ll use the code below.
<RoutingRules>
  <RoutingRule>
    <Condition>
      <KeyPrefixEquals>oldblog/</KeyPrefixEquals>
    </Condition>
    <Redirect>
      <HostName>newdomain.com</HostName>
      <ReplaceKeyPrefixWith>newblog/</ReplaceKeyPrefixWith>
    </Redirect>
  </RoutingRule>
</RoutingRules>
This rule ensures that requests for olddomain.com/oldblog/specific-blog-post will redirect to newdomain.com/newblog/specific-blog-post.
Migrate Disqus comments
Disqus provides a tool for migrating the comment threads from your old blog site to the new one. You can find it in your Disqus admin tools at your-short-name.disqus.com/admin/discussions/migrate/.
To migrate posts from the old blog address to the new one, we’ll use the URL mapper tool. Click “Start URL mapper,” then “you can download a CSV here.”
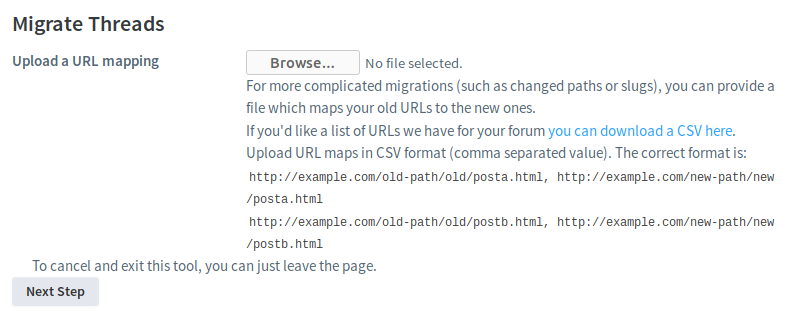
Disqus has decent instructions for how this tool works, and you can read them here. Basically, you’ll input the new blog URLs into the second column of the CSV file you downloaded, then pass it back to Disqus to process. If you’re using a program to edit the CSV, be sure to save the resulting file in CSV format.
Unless you have a bazillion URLs, the tool works pretty quickly, and you’ll get an email when it’s finished. Don’t forget to update the name of your site in the Disqus admin, too.
Transfer other settings
Update links in your social profiles and any other sites you may have around the web. If you’re using other services attached to your website like Google Analytics or IFTTT, don’t forget to update those details too!
aws websites